Hi again,
Well, not doing so well at the post a week...perhaps that was too ambitious and monthly is more achievable :) I chose today's card as I've seen a sneaky peek of Spring and so butterflies should be on their way soon to brighten up our gardens.
This card was created as a birthday card for Mum who loves her garden and all the creatures that visit it.
This is an 8x8" square card. The background was created with a stencil and the centre panel was a single stamp by Kanban. I stamped it once on smooth card and coloured it with Distress inks. Then I stamped it again onto vellum and embossed it with black WOW embossing powder. I painted the butterflies with H2Os, cut them out when dry and shaped them. Then I attached them with a little glue gel down the centre. A gem in each corner to pick up the bronze layers finished it off.
Hope you like my welcome Spring post
Mani x
Showing posts with label Embossing. Show all posts
Tuesday, 18 March 2014
Saturday, 8 February 2014
Be My Valentine...
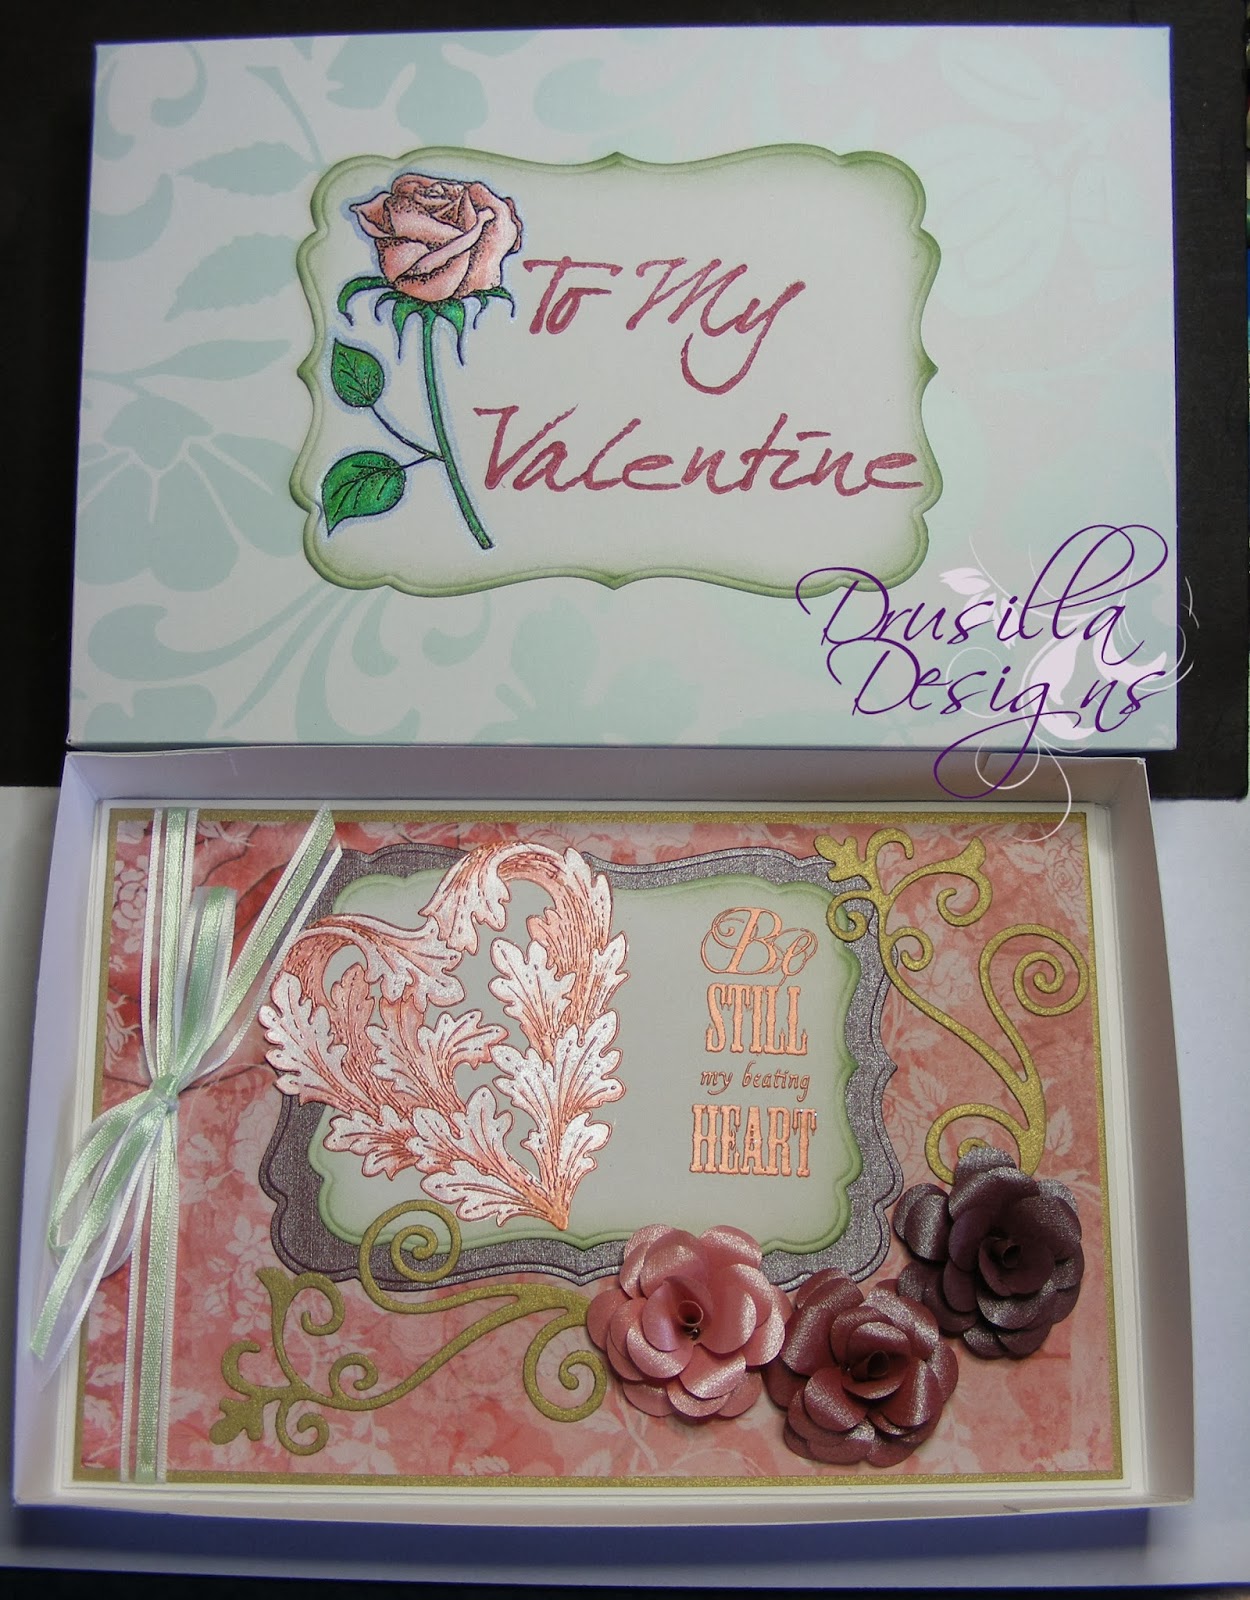
Thanks to the flu, I missed last week's post but hopefully I am back on track now. With Valentine's Day just around the corner I wanted to share with you a card I made for my Dad to give to my Mum a couple of years ago. Mum's not really the cute teddy bear type so here was my take on an elegant card for her.
The main heart image and text are stamps by Chocolate Baroque. Knowing that (big shock) I would be painting it with H2Os, I knocked back the bling by using copper embossing powder, rather than gold. Likewise, I chose a green ribbon to complement the pinks and break them up a bit. The flowers were made from Centura Pearl paper from Crafter's Companion
Hope you all have a lovely Valentine's Day,
Mani x
The main heart image and text are stamps by Chocolate Baroque. Knowing that (big shock) I would be painting it with H2Os, I knocked back the bling by using copper embossing powder, rather than gold. Likewise, I chose a green ribbon to complement the pinks and break them up a bit. The flowers were made from Centura Pearl paper from Crafter's Companion
The box has a lovely green leafy pattern, to echo the ribbon. The image is by Creative Expressions, painted to match the heart inside. The alphabet stamps are by Banana Frog, sadly no longer trading, again in copper embossing powder.
Hope you all have a lovely Valentine's Day,
Mani x
Sunday, 26 January 2014
A day late...
Oh and I was doing so well blogging every Saturday night but flu scuppered me this week. Anyway, here is the 18th Birthday card I promised last week. Hope you like it.
The card is 8x8". The focal point is one of Mitzi Sato-Wiuff's amazing images "Dragon Lore", coloured with promarkers. I've mounted her onto a piece of black card stock, embossed with one of the "A Little Bit Oriental" folders from the Sheena Douglass range and highlighted very sparingly with some Pebeo gilding wax.
Until next week,
Mani x
Saturday, 18 January 2014
I demand a recount!
Well, this is the week I have been dreading. My eldest daughter turns 18 on Wednesday! Obviously, there is something wrong with the maths here as no way am I old enough to have an 18 year old! I shall just have to keep looking at the little one (soon to be 5) to feel younger :)
As I can't post a pic of her 18th Birthday card before she sees it, I shall post the second of the cards I made for her last milestone birthday, her 16th. I made her two cards as one was for my Mum and Dad to give to her.
Jordanna loves Steampunk and Victoriana and, as I mentioned in the post with her last card, her 16th birthday present was a full Steampunk outfit. So I kept her second card in this theme too. It is another 8 x 8" square card.
I used number stamps from Crafters Companion. However, the stamps were heavily patterned and the pattern didn't fit in with the style of this card. So, I stamped them in a very, very pale ink, trying not to get too much of the middle transferred onto the card. I then random stamped with various steampunk images, some plain ink, some embossed and making sure I went over the original lines to alter the original shape of the numbers. Then I cut them out, inked them with some Distress Ink and matted them onto black card that I cut by eye.
Lastly, I used some Cosmic Shimmer gold pva to create some texture both on the numbers and on the background, to tie them together. I cut some cogs with a die and kept them black as I didn't want them fighting with the main images.
Hope you like it and don't forget to leave a comment if you like it or want more info
Mani x
As I can't post a pic of her 18th Birthday card before she sees it, I shall post the second of the cards I made for her last milestone birthday, her 16th. I made her two cards as one was for my Mum and Dad to give to her.
Jordanna loves Steampunk and Victoriana and, as I mentioned in the post with her last card, her 16th birthday present was a full Steampunk outfit. So I kept her second card in this theme too. It is another 8 x 8" square card.
The main image is a digi stamp by Kenny K, coloured with Promarkers. I cut her with a thin white border to make sure she popped from the background paper.
I used number stamps from Crafters Companion. However, the stamps were heavily patterned and the pattern didn't fit in with the style of this card. So, I stamped them in a very, very pale ink, trying not to get too much of the middle transferred onto the card. I then random stamped with various steampunk images, some plain ink, some embossed and making sure I went over the original lines to alter the original shape of the numbers. Then I cut them out, inked them with some Distress Ink and matted them onto black card that I cut by eye.
Lastly, I used some Cosmic Shimmer gold pva to create some texture both on the numbers and on the background, to tie them together. I cut some cogs with a die and kept them black as I didn't want them fighting with the main images.
Hope you like it and don't forget to leave a comment if you like it or want more info
Mani x
Saturday, 15 September 2012
Decoupaged Stamp
Today's card is another example of mixing traditional watercolours (sky and skin) with Luminarte Twinkling H20s (fan and clothing). Again I used just one shade of each colour and letting the water do the shading for me. I stamped the image several times to create my own decoupage and kept the card quite simple as I thought the stamp was so striking, too much would ruin its impact.
Thanks for popping by,
Mani x
Thanks for popping by,
Mani x
Saturday, 8 September 2012
King of the Dads
Lovely and sunny here again today - of course it is now the kids have all gone back to school.
Today's card is one I made for Alastair for Father's Day. Again, I chose it to blog because everything started out as blank white card (apart from the background dark brown) It was coloured and stamped with Distress Inks. I think my favourite part is how the playing cards look like wood. I got that effect by dragging the cut n dry foam down the card, after embossing, rather than swirling it on.
Materials Used: White Card, white tag, Tim Holtz embossing folder, Inkylicous stamps, Distress Inks, Copper Wow Embossing Powder
Mani x
Today's card is one I made for Alastair for Father's Day. Again, I chose it to blog because everything started out as blank white card (apart from the background dark brown) It was coloured and stamped with Distress Inks. I think my favourite part is how the playing cards look like wood. I got that effect by dragging the cut n dry foam down the card, after embossing, rather than swirling it on.
Materials Used: White Card, white tag, Tim Holtz embossing folder, Inkylicous stamps, Distress Inks, Copper Wow Embossing Powder
Mani x
Subscribe to:
Posts (Atom)