Friday 18 April 2014

One Layer Birthday Card

Hello all,

Today's card was made this week for my bff's birthday.  I wanted to do a single layer card so this was created all directly onto the card, using masks.  This was actually the second attempt.  The first version was not embossed so the paint looked scrappy and the inking in the bottom panel was too dark and too dominant.  Well, we can't all get it right first time, eh?


I started with an A5 card blank and rounded the corners.  I then stamped the peacock (from Kanban) in Versamark and embossed it with Stamp N Stuff black embossing powder.  I stamped the image onto a post-it note, cut it out and lined it up over the image.  When cutting it out I was careful to cut just slightly into the black outline.  This meant that I did not get a white outline when inking.

Next I roughly tore a strip of copier paper and used that to mask off the top of the card. I then applied Distress Inks in Tumbled Glass with a little Peacock Feathers for definition, using Cut N Dry foam.  

Using the same ink (Tumbled Glass) I then randomly stamped the inked area with Falling Feathers stamp by Sheena Douglass.  

Once all the inking was dry, I stamped Happy Birthday from Stamps Away wordy sets.


I really wanted the amazing tail to be the focal point of the card so I decided that would be the only area I painted.  I used just 2 colours from the H20s range (I think Bronze Medallion and Autumn Skies but don't shoot me if I've got that wrong).  I used the paint very thick as the embossing would keep it under control for me and I wanted maximum mica.

Hope you like it,

Mani x

Tuesday 18 March 2014

Flittering Butterflies

Hi again,

Well, not doing so well at the post a week...perhaps that was too ambitious and monthly is more achievable :)  I chose today's card as I've seen a sneaky peek of Spring and so butterflies should be on their way soon to brighten up our gardens.

This card was created as a birthday card for Mum who loves her garden and all the creatures that visit it.


This is an 8x8" square card.  The background was created with a stencil and the centre panel was a single stamp by Kanban.   I stamped it once on smooth card and coloured it with Distress inks. Then I stamped it again onto vellum and embossed it with black WOW embossing powder.  I painted the butterflies with H2Os, cut them out when dry and shaped them.  Then I attached them with a little glue gel down the centre.  A gem in each corner to pick up the bronze layers finished it off.

Hope you like my welcome Spring post
Mani x

Tuesday 18 February 2014

A Little Bit of Sunshine...

With all this rain and gloom, I thought we could all do with a bit of sunshine in our lives.  I made this card for my Mum for her birthday one year as she loves her garden and all things floral.


This was created using the Papermania Build a Sunflower set of stamps.  I repeat stamped the single image of a complete sunflower, using masks made from sticky notes to overlap the images and create a field of sunflowers.  They were then coloured using Promarkers.


I created an extra flap on the front by cutting it with my 2nd mat.  I used the full set to "build" three 3D sunflowers, again coloured with Promarkers.  Some bright yellow ribbon and a sentiment finished the card.

Hope this brightened your day,
Mani x

Saturday 8 February 2014

Be My Valentine...

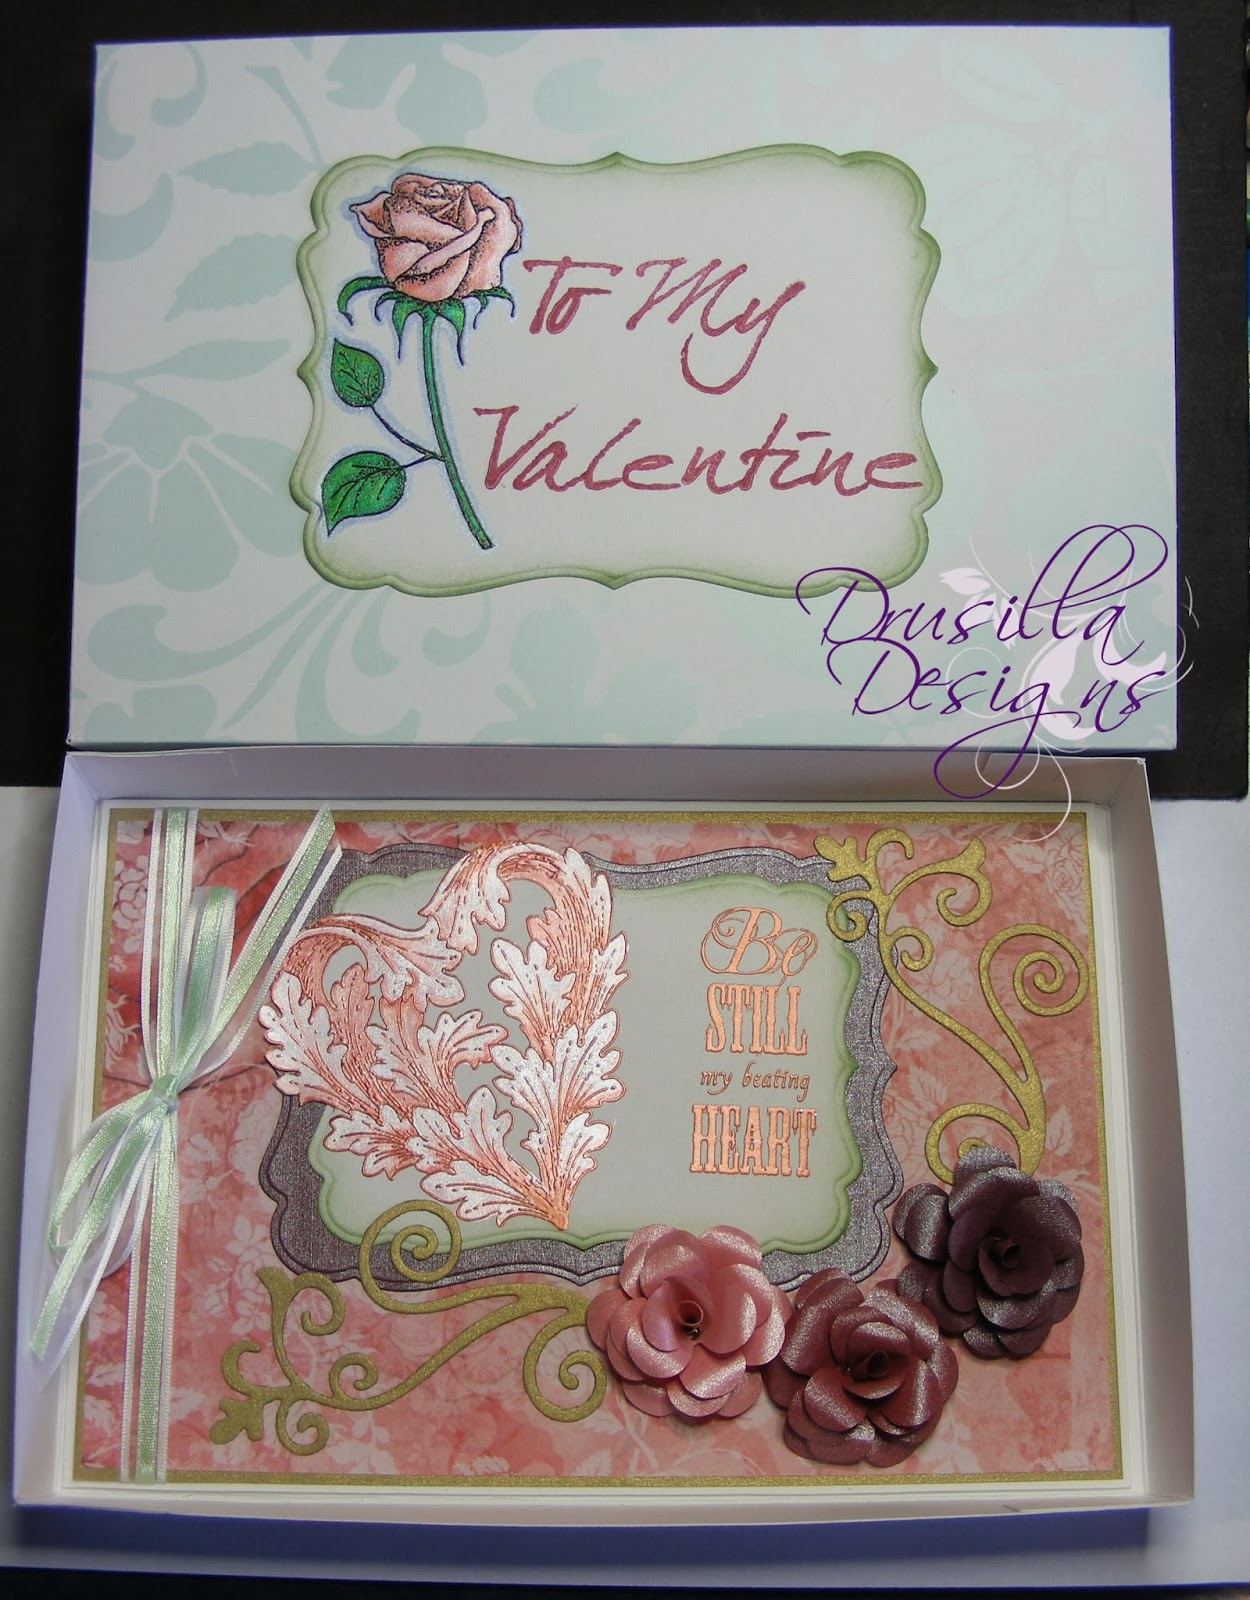
Thanks to the flu, I missed last week's post but hopefully I am back on track now.  With Valentine's Day just around the corner I wanted to share with you a card I made for my Dad to give to my Mum a couple of years ago.  Mum's not really the cute teddy bear type so here was my take on an elegant card for her.


The main heart image and text are stamps by Chocolate Baroque.  Knowing that (big shock) I would be painting it with H2Os, I knocked back the bling by using copper embossing powder, rather than gold.  Likewise, I chose a green  ribbon to complement the pinks and break them up a bit.  The flowers were made from Centura Pearl paper from Crafter's Companion


The box has a lovely green leafy pattern, to echo the ribbon.  The image is by Creative Expressions, painted to match the heart inside.  The alphabet stamps are by Banana Frog, sadly no longer trading, again in copper embossing powder.


Hope you all have a lovely Valentine's Day,

Mani x

Sunday 26 January 2014

A day late...

Oh and I was doing so well blogging every Saturday night but flu scuppered me this week.  Anyway, here is the 18th Birthday card I promised last week.  Hope you like it.


The card is 8x8".  The focal point is one of Mitzi Sato-Wiuff's amazing images "Dragon Lore", coloured with promarkers.  I've mounted her onto a piece of black card stock, embossed with one of the "A Little Bit Oriental" folders from the Sheena Douglass range and highlighted very sparingly with some Pebeo gilding wax.  


Until next week,
Mani x

Saturday 18 January 2014

I demand a recount!

Well, this is the week I have been dreading.  My eldest daughter turns 18 on Wednesday! Obviously, there is something wrong with the maths here as no way am I old enough to have an 18 year old!  I shall just have to keep looking at the little one (soon to be 5) to feel younger :)

As I can't post a pic of her 18th Birthday card before she sees it, I shall post the second of the cards I made for her last milestone birthday, her 16th.  I made her two cards as one was for my Mum and Dad to give to her.

Jordanna loves Steampunk and Victoriana and, as I mentioned in the post with her last card, her 16th birthday present was a full Steampunk outfit.  So I kept her second card in this theme too.  It is another 8 x 8" square card.


  The main image is a digi stamp by Kenny K, coloured with Promarkers.  I cut her with a thin white border to make sure she popped from the background paper. 


I used number stamps from Crafters Companion.  However, the stamps were heavily patterned and the pattern didn't fit in with the style of this card.  So, I stamped them in a very, very pale ink, trying not to get too much of the middle transferred onto the card.  I then random stamped with various steampunk images, some plain ink, some embossed and making sure I went over the original lines to alter the original shape of the numbers.  Then I cut them out, inked them with some Distress Ink and matted them onto black card that I cut by eye.


Lastly, I used some Cosmic Shimmer gold pva to create some texture both on the numbers and on the background, to tie them together.  I cut some cogs with a die and kept them black as I didn't want them fighting with the main images.

Hope you like it and don't forget to leave a comment if you like it or want more info
Mani x

Saturday 11 January 2014

New Year's Resolution

Hope you all had a fabulous Christmas and New Year.  My New Year's Resolution is to be more active with my blogging.  Now Daughter No.2 is all settled in school, I have finally got some time to concentrate on Drusilla Designs.

So, to a new card.  The one I have chosen today is a completely out-of-season Christmas card.  I've chosen this because I wanted to show off the amazing artwork by Mitzi Sato-Wiuff (Aurora Wings) and to show that when the artwork is this stunning, you can really let the art do the talking and keep the rest of the card simple.  Try to enhance, not detract.


The image was coloured with Promarkers and given a little inking around the edges with some Distress Inks. The background is a beautifully printed vellum and the card is embellished very simply with a single Marianne Dies die cut and some clear gems.  The bow on the bauble brings in  a touch of colour, reflecting the fairy's bow.

Hope you like it and good wishes to you all for the year ahead,

Mani x